Tuesday, August 23, 2011

AM Tutoring Tips and Tricks part 12 - Borrowing keys

While making moving holds, borrowing keys saves a lot of time. Moving holds are not only to keep the character alive, but also give time for the poses to be read by the audience.

A pose can not be read in only one frame. Even in a fast movement, it needs to be given at least 2 frames. A pose will be read in the graph editor like the picture below:
Since we need at least 2 frames for a pose to read, moving holds are required to avoid dead pixels and to keep the character alive. Borrowing keys is the most efficient way of creating moving holds to me .

How do you borrow keys in Maya technically? Move the timeline to the frame where you would like to borrow from (it doesn't need to be a key), middle mouse drag it to where the pose starts, and set a key.

Here is an example of how borrowing keys works. Let's start with a simple ball moving from screen left to right in 24 frames, flat tangents on both sides.
I'd like to make a moving hold for the ending pose (f24), so I'm going to borrow the pose from f22 for f12.
After a quick adjustment of smoothing the curve, the pose is easily read because of the moving hold.

There are still a few adjustment needed after borrowing keys, but it will quickly give you a moving hold .

This is a simple demo for introducing the idea of borrowing keys, when animating a full body rig, more tweaks/adjustments will be needed.

Article created by Erik Lee, refined by Joseph Taylor.

Tuesday, August 16, 2011

AM Tutoring Tips and Tricks part 11 - CG-ish poses

It's very important to make a CG character not look CG-ish. This means we need to eliminate the CG-ish movements and poses. Since we already discussed animating characters from the inside out in Part 5, let's go for posing this week.

I quickly made 2 poses, before and after, so we can compare them side by side. The pose on the left, even though it's a bit exaggerated, shows an example of how a CG-ish pose looks. The pose on the right is refined, and it feels more organic and interesting.

So, the question is, what exactly makes a pose CG-ish?

In most cases, dead straight lines cause the CG feeling. Computers create perfectly straight lines or geometry, they're mathematically correct, but lifeless and boring. Like the picture below, you can see there are a few dead straight lines I drew in red, which show the stiffness. Plus the negative space between the screen right arm and the body is a regular triangle. Those perfect angles and lines here are the main reason this pose looks lifeless and uninteresting.

After refining, you can see there are more curves around the body, which also make the pose more interesting to look at. Bent arms are not only for creating curves, but also make them feel more organic and fresh.

Let's look at more details.
The hand on the left, doesn't have much detail and the spaces between the fingers are very even. The hand on right is more polished, I moved the middle finger closer to the pinkie to breakup the even spacing. Using a little bit of cup, tweaking the finger joints and bending the thumb outward make the hand feel more organic.

Let's take a look at the hand on the hip. The hand on left feels like it's not supporting the weight of the arm and hand, because the wrist and hand are perfectly straight and the fingers are parallel to each other. So I bent the wrist a little, and made the fingers overlap each other. Now we can see the weight being supported, and the contact is more believable.

In sum, breaking the perfectness made by the computer is key to eliminating the CG-ish feeling. I usually use the different attributes as much as possible to make the pose more alive. Let's take a hand for example, don't forget to use palm cup, finger twist and spread, every joint...etc. If penetration is a necessary evil to make the pose more organic, then go for it. Think making poses more graphic, don't be lazy, do whatever you need to do to kill the monster!! :)

Article created by Erik Lee, refined by Joseph Taylor.

Wednesday, August 10, 2011

Skip a week....

Please forgive me for skiping post this week. I need to deal with some personal stuff and packing up for my flight back to US this Sunday. (end of vacation....NOOOOoooooo........)

I'll be back next week, please stay tune! :)


Tuesday, August 02, 2011

AM Tutoring Tips and Tricks part 10 - Defeat Animator's Voldemort.

It's about time to face animators' Voldemort - Constraints. Constraining objects is tricky for animators, if we do it right, it can help us save a lot of time, and make things easier to animate; but it can also put us in an endless hell if we do it wrong. I'm not an expert of programing type stuff, but I wish I was. So the trick I'm going to share is more like my personal experience, and as usual, please kindly share your magic if you know anything that might be better.

There is a universal principle for me when using parent constraints. I usually make the heavier object the parent, and the lighter object the child. The heavier object will be leading the action most of time, and it will be easier to control if I make it the parent. For example, if there is a guy trying to lift a heavy ball, then I'll make the ball the parent, and the hands the child. This way I can animate the ball up and down first, and then work on the hands to eliminate the IK feeling.

Before we dive into animation, I would like to explain the way I usually apply constraints. This trick is very useful, especially when animating referenced files.

First of all, I'd like to clarify the differences between "Parent" and "Parent Constrain". "Parent" (p) will allow you to animate the child’s attributes, but is not able to be switched on and off. "Parent Constrain" is able to be switched on and off, but you can't animate the child’s attributes when it's on. So if you are using a referenced file, then the best way to set up a parent constraint is making an alternate controller. So you'll be able to switch the constraint on and off and animate attributes as well.

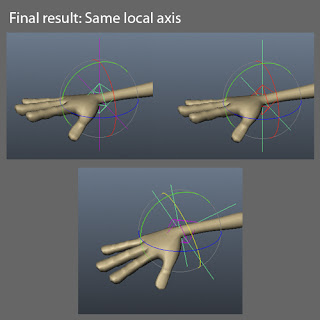
For the alternate controller, the goal is to build a controller which has the same local axis as the original one.

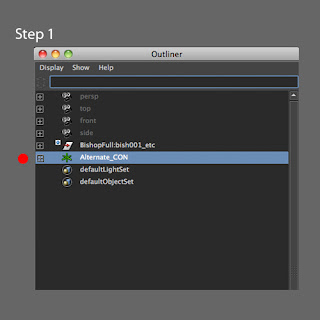
Step 1: Create a locator, and zero out the translation and rotation values.

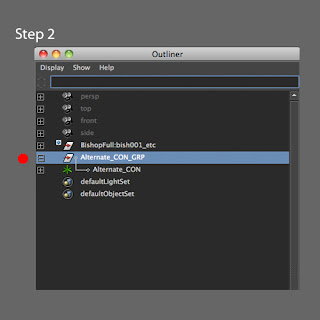
Step 2: Select the new controller, and create a group above it (ctrl+g)
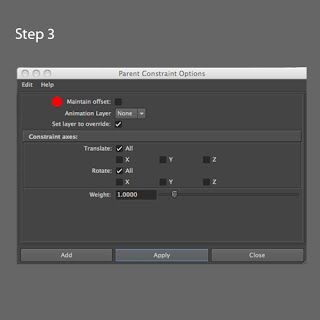
Step 3: Select the original controller you would like the alternate controller to control, in this case, the right IK hand, and then shift+select the new controller group, uncheck "maintain offset" in the "Parents constrain" option box, and hit apply. You should see the new controller snap to the original controller in this step.
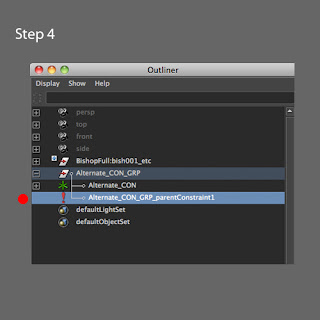
Step 4: Open the outliner, and DELETE the constraint we just created under the new controller group. Now you have a new controller which has the same local axis as the original controller.
Step 5: Select the new controller, then shift+select the original controller, and apply "Parent Constrain" (maintain offset shouldn't make any different at this point) *
After the alternate controller for the hand is built, here is my rule, I'll only set keys on the alternate controller when the constraint is on, and set keys on the original controller when the constraint is off.

The last step is easy (trust me.), select your alternate controller group, then the ball controller, and "Parent" (p) them. DONE, now you should have an alternate controller, which is controlling the original controller, parented to the ball, and is also free to animate.

In sum, I hope this is not too confusing. I'm sure this is not the easiest way to do it, and there must be a lot of mel scripts that can do the same thing with one click. I'd like to share them with you if I find any. But understanding how it works before using magic will help you feel more comfortable fixing problems if something goes wrong (it always goes wrong....always...)

*Make sure you set a key before the parent constraint is applied, so it will add an attribute which allows you switch the constraint on and off.

Article created by Erik Lee, refined by Joseph Taylor.