Friday, March 23, 2012

AM Tutoring Tips and Tricks part 15 - Basic, basic and basic

It's always a good idea to start with the basics: bouncing ball practice, an assignment to help you understand animation principles such as Timing, Arc, Squash and Stretch, Timing and Spacing.

From below you could see how a basic bouncing ball practice could be completed and learn how an animator generally begins his/her endeavor to learn how to animate. Here we won't apply any materials or texture on the ball - just so you could concentrate on animating an dynamic object from scratch.
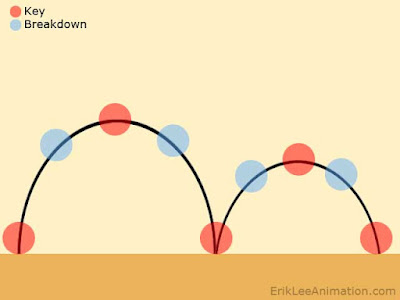
1. Key pose
Tangent Type: Stepped
In this stage, all the extreme poses will be keyed as the red balls shown in the picture below. The reason I turn the tangents to stepped, is because I don't want to be distracted by the computer generated in-between.
2. Breakdown Pose
Tangent type: Linear.
Setting up breakdown poses help me define arc and rough spacing here. If you look at the picture below close enough, you might notice that I put the breakdown poses in slightly different height in every jump. The reason is try to break the computer perfection, and make it physiologically correct. (you might want to check with your physics friends.)

3. In-Between
Tangent type: Auto, Clamped, Spline or Plateau
Refine and polish your curves, make sure you key the in-between at the proper places to realize the picture in your mind.

You can see the progression video here:


So, a bouncing ball with no materiel applied, no squash or stretches is almost done here. Before it's finalized, I usually check the Spacing and Arc. Here are two pictures that might help you understand what spacing and arc are.

Spacing
Spacing varies from object to object due to the following variables: materiel (wooden, metallic, or...etc), gravity (on earth or moon), and styles.
Arc
Due to the great gravity, everything moves in arc (ok, except some kind of robot...).


Have fun! :)


Tuesday, December 13, 2011

2012 Demo Reel

Finally, my new demo reel is up!
There are many shots from Skylanders included, which were made by the amazing Brain Zoo team. I had a lot of fun by animating them, and hopefully you'll enjoy them as well.

New demo reel, please visit: ErikLeeAnimation.com

cheers!

Tuesday, November 08, 2011

AM Tutoring Tips and Tricks part 14 - Control Your Curves

As an animator who uses the computer as a tool, knowing how the computer works is extremely important. Not only for the sake of saving time, but also for problem solving when something goes wrong (and it always does).

There is one thing I have to clarify at the very beginning, computers don't think! They do not create anything. Actually, the computer is probably the most loyal in-betweener ever.

There are a few principles I follow all the time. The goal of using the graph editor for me is to take advantage of the computer as much as I can. At the same time, the computer won't have a chance to decide anything for me, or send a killer robot to the past to terminate my mom. :)

1. Control your extreme poses.
I always have flat tangents at my extreme pose. So the computer knows where I would like the pose to hit the extreme and then generates mathematically correct in-betweens.

If I don't have flat tangent at the extreme poses...
...then the computer decides where the extreme pose should be. Which you might be lucky to get to look right, but people are not always lucky.

2. After the extreme poses are made, make your breakdown poses controlled as well.
I set up breakdown poses by using keys, instead of pulling tangents in/out. That way I can decide which pose I would like to favor, or how much slow in/out I like.

I know I mentioned that I use weighted tangents all the time, but I only pull them in/out for preview - then set keys after it looks right. I can work fast without wasting time on setting unsure keys, and gain control back later.

For breakdown tangents, please make sure they follow the curve...
If you don't make the tangents follow the curve, those flat(or whatever they are) tangents will create unintended extremes. You might not be lucky enough to get the nice arcs this time. Even though sometimes these types of curves could give me a nice touch of realistic randomness, I'll still set keys on those places pointed by the red arrows, that way everything is still under my control.

When you're frustrated by a popping coming from nowhere, or an arc that just can't be smoothed - before you stand up and get a hammer to give your computer an "animator-smash", calm down, they're innocent. Most of time, we are the ones who cause the trouble. Good news is, we are also the one who can fix it.

I guess in this regard, it might be a good thing to have control issues.

Cheers.

Article created by Erik Lee, refined by Eric Digilov.

Thursday, September 29, 2011

Profile Updated

Another great term has started, can't wait to see you in the QA!!
Just quickly update my profile while waiting, add more projects I did and doing.

Good luck guys! Happy animating. :)


Monday, September 05, 2011

AM Tutoring Tips and Tricks part 13 - Lip sync

Speaking of the lip sync, I usually treat it differently than body animation. Keeping curves clean is not the main concern, instead going straight ahead and making it look right is the way to go.

I start with the jaw up/down and the corners in/out. After I get the overall timing of the lip sync right, I dive into the details and polish. There are a few things on my check list:

1. Anticipation for the dialogue.
2. 2 frames of closed mouth pose on "M", "B", "P" and whenever it is needed.
3. The arcs on the corner.
4. Ease in/out for the dead straight curves in graphic editor.
5. Mouth up/down.
6. Interaction with cheeks.
7. Favoring pose on jaw.
8. Cheek puff, lips interaction...etc.

As an example, I took an audio file from Google Translate for the word: "Popcorn". I chose this word because there are quick mouth open/close poses on "POP". It is a great example of how to apply those principles and make the snappiness work. Here is the video:
The clip on the left is rough blocking. It has accurate timing, but some mouth shapes need more work to read more clearly. On the "POP", as I mentioned before, the mouth open/close is too fast to read. Plus, there are no arcs on the corners, and the overall mouth doesn't look fresh.

I put the polished version side by side with the blocking so you can see the difference better.

First thing I check for is if the anticipation is working. This is extremely important for lip syncs. We "see" the mouth shapes first, and then "hear" the audio later. The mouth shapes are anticipating the audio. In order for the audience to register the dialogue, the mouth shapes need to be a few frames ahead of the audio. Generally speaking, in Maya, I start with by setting a key at least 2 frames before the waveform (in the timeline) starts, and add more frames when needed.

Next, I go frame by frame for the 2 frames of the mouth closed poses. The lips are not just closed on both frames, but on one lower than the other, so the mouth feels more fleshy when the lower lip pushes the upper lip up. Then when the mouth opens, I make it pop open in one frame. I give another frame to favor and settle. Same thing applies to the second mouth closed poses. So even though the mouth moves a lot in a very short amount of time, we can still read it clearly and kill the evil popping monster.

Then, I add some favor poses on the jaw, refine the arcs on the corners, cheek puffs on "P", up/down on the mouth. I finish off with some tiny polish when lips are touching each other to get the fleshy feeling and avoid penetration.

Even though I usually do the lipsyncs straight ahead, I still use of the graph editor for help. Making the animation looks right first, and come back to clean curves up later when I have time. The trick to make lip sync animation better? Keeping your check list in mind, and most importantly, practice, practice and practice.

Have fun! :)

Article created by Erik Lee, refined by Eric Digilov.

Tuesday, August 23, 2011

AM Tutoring Tips and Tricks part 12 - Borrowing keys

While making moving holds, borrowing keys saves a lot of time. Moving holds are not only to keep the character alive, but also give time for the poses to be read by the audience.

A pose can not be read in only one frame. Even in a fast movement, it needs to be given at least 2 frames. A pose will be read in the graph editor like the picture below:
Since we need at least 2 frames for a pose to read, moving holds are required to avoid dead pixels and to keep the character alive. Borrowing keys is the most efficient way of creating moving holds to me .

How do you borrow keys in Maya technically? Move the timeline to the frame where you would like to borrow from (it doesn't need to be a key), middle mouse drag it to where the pose starts, and set a key.

Here is an example of how borrowing keys works. Let's start with a simple ball moving from screen left to right in 24 frames, flat tangents on both sides.
I'd like to make a moving hold for the ending pose (f24), so I'm going to borrow the pose from f22 for f12.
After a quick adjustment of smoothing the curve, the pose is easily read because of the moving hold.

There are still a few adjustment needed after borrowing keys, but it will quickly give you a moving hold .

This is a simple demo for introducing the idea of borrowing keys, when animating a full body rig, more tweaks/adjustments will be needed.

Article created by Erik Lee, refined by Joseph Taylor.

Tuesday, August 16, 2011

AM Tutoring Tips and Tricks part 11 - CG-ish poses

It's very important to make a CG character not look CG-ish. This means we need to eliminate the CG-ish movements and poses. Since we already discussed animating characters from the inside out in Part 5, let's go for posing this week.

I quickly made 2 poses, before and after, so we can compare them side by side. The pose on the left, even though it's a bit exaggerated, shows an example of how a CG-ish pose looks. The pose on the right is refined, and it feels more organic and interesting.

So, the question is, what exactly makes a pose CG-ish?

In most cases, dead straight lines cause the CG feeling. Computers create perfectly straight lines or geometry, they're mathematically correct, but lifeless and boring. Like the picture below, you can see there are a few dead straight lines I drew in red, which show the stiffness. Plus the negative space between the screen right arm and the body is a regular triangle. Those perfect angles and lines here are the main reason this pose looks lifeless and uninteresting.

After refining, you can see there are more curves around the body, which also make the pose more interesting to look at. Bent arms are not only for creating curves, but also make them feel more organic and fresh.

Let's look at more details.
The hand on the left, doesn't have much detail and the spaces between the fingers are very even. The hand on right is more polished, I moved the middle finger closer to the pinkie to breakup the even spacing. Using a little bit of cup, tweaking the finger joints and bending the thumb outward make the hand feel more organic.

Let's take a look at the hand on the hip. The hand on left feels like it's not supporting the weight of the arm and hand, because the wrist and hand are perfectly straight and the fingers are parallel to each other. So I bent the wrist a little, and made the fingers overlap each other. Now we can see the weight being supported, and the contact is more believable.

In sum, breaking the perfectness made by the computer is key to eliminating the CG-ish feeling. I usually use the different attributes as much as possible to make the pose more alive. Let's take a hand for example, don't forget to use palm cup, finger twist and spread, every joint...etc. If penetration is a necessary evil to make the pose more organic, then go for it. Think making poses more graphic, don't be lazy, do whatever you need to do to kill the monster!! :)

Article created by Erik Lee, refined by Joseph Taylor.