Sunday, May 29, 2011

AM Tutoring Tips and Tricks part 6 - Animate from inside out, thought process.

Last week we told about how to mechanically make your animated character alive, so let's talk about something inside of character's mind, how to analyse and use it to create believable characters.

For me, watching a lot of movies is the best way to learn acting, and it's probably much cheaper than taking acting classes. I watch many movies (but the weird thing is my list never get shorter), but not just watch. I pay attention to their acting, what's the story, what's inside of their minds, what's the relationship...etc. I found this become one of the standerd for me to rate movies, and plus, it makes good movies even more interesting by details which I didn't notice before.

I took a clip from movie named "Fair Game", (Sean Penn, Naomi Watt) to explain how I analyse a scene, and how it's going to help me animating. Before you watch this clip, I'd like to give you a heads up (not-that-much spoil alarm). Sean Penn is an Ambassador to Niger and Naomi Watt is his wife. At this friends gathering, there is one guy starts a racist topic about people from mid-east...


Here is what I read from the scene:

-F120, Sean Penn: "what are you talking about?", then he rise his head and say "no...not the racist BS...".

-F340 he is try to cover his upset and not to embarrass his friend.

-His wife here, apparently who knows Sean Penn the most, knowing something is coming, and wish this guy can just stop talking.

-F660, Sean Penn look at this guy and think about: "Are you sure you want to keep talking? Because I'm not going to stand this!" (Angry)

-F740, Naomi Watt: "no...it's coming." (Embarrassing)

-Then the last shot Sean Penn sits up and strikes back, the scene ends here.

Analyse what's inside of character's mind could help me chose what's the best acting choice for my shot. I usually prefer to simplify it to a word or a simple sentence, then everything else need to support this idea. If I have character is growing his anger inside like Sean Penn here, a little root happy bouncing might not be the best fit.

In this clip, We don't even need to see the end and exactly know what's going to happen next. Sean Penn doesn't need to say a word but express them crystal clear. This is the same goal that animation should achieve. We have no luxury to let audience guess what's going on, otherwise we'll pull the audience out of screen and lose believability immediately.

P.S. As a movie lover, there is nothing better then having a good time and call it research! :)


Friday, May 20, 2011

AM Tutoring Tips and Tricks part 5 - Animate from inside out, physically.

For a human character, in most of cases, animating from root, through body to the finger tips makes character alive. Even though we probably heard of "Animate from inside out" thousand times, I ask myself all the time, "what the heck is that means?" and how to apply it to my animation?

Let's take a simple example to explain, rise a resting arm up and pointing forward. I bet you can do this in real live without even think about it, but as an animator, we need to analyse how exactly this action happened. The order was sent from our brain, go through bunch of muscles and bones, then the action happens (forgive me can't be accurate about the exact process, otherwise I'll be a doctor instead of animator.)

The word "believable" is actually from the library we build in our mind, by watching this kind of action over and over again. If we see a human moves his/her wrist without any tiny movement from forearm, upper arm or shoulder, he/she gotta be either an outstanding break dancer or a terminator. We will catch it instantly because it against the library of our brain. So if we didn't animate our character from inside out, it will take away the believability from audiences instantly as well.

How to apply it to animation? I did a little demo to show my understanding here:


So the left one is what computer gives me after I set 2 poses, which looks ok, but it's lifeless and doesn't feel organic at all. What I did for the right one, which is more polished version, I made the shoulder move first, and then bring the upper arm, fore arm and the hand follows. You might notice this is the classic principle of overlapping action and follow through, and you're right indeed. This is more about knowing why exactly we need to apply animation principles. If we only apply it without knowing why, for this clip for example, it's very easy to fall in the "noodle-y arm" trap.

In sum, Instead of making a rule like "everything needs to move from root!" I prefer to analyse where is the force come from before I start a shot. If my character is sitting and rising his head, then the force will go internally from root, chest to the head. On the other hand, if he got a ball hit on his head very hard(external force), then his head will go forward without any anticipation from root. Figuring out where is the force come from will help you to create believable animation.

Sunday, May 08, 2011

AM Tutoring Tips and Tricks part 4 - Animation Layer


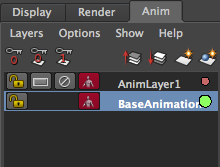
If you're using maya 2010 or above, I found a tool is extremely helpful for animation called "Animation layer". you can find it on the right bottom corner in maya.
It helps me to keep my curves clean and easy to manage when I design to add texture on my animation. I quickly did an animation (and a picture) for a demo to show how I use it and how it helps me.


A simple head rise animation, on the left side is animation without texture, basically I got the timing and everything works in this layer. As you can see in the picture, the Rotation X (RX) is controlling the head rising, and RY here is simple, just slightly going down, which means the head has turn just a little.

It moves smoothly, but boring. The idea here is adding some textures to make it more interesting without messing up the original curves. So I select the head controller, create the animation layer, set keys on RY (start with 0 as default) for the head shake.

As it shows on the left in the video, now I'm not only have a head rise, but it also has a nice head shake as texture. Plus, thank to the animation layer, my curves are clean (in both layers). If I need to tone down the head shake later, all I need to do is going to second layer and scale the curve down.

In Sum, creating too many layers might lead you into chaos. However, it is a powerful tool to add things on top without mess up the original animation. I personally like to use it for the extra touch of final polishing, such as shaking or jiggling, and it only applied after the base animation get approved.

Hope this helps,

cheers.

Sunday, May 01, 2011

AM Tutoring Tips and Tricks part 3 - Reuse polished curves.

How to animate fast? wisely reuse the curves already been done could help a lot.

Unless you have bunch of awesome genius riggers got your back, otherwise it needs a lof of work to make the CG model move organically. Facial animation for an example, working individually on cheeks, nose, lower eye lids could take you hours and hours. so why not to use the curves already finished, and apply them to the other connected parts?

I'll take last shot I did for an example.

After I finaled the lip-sync, most of all, up and down on the jaw. It connects to the cheeks, nose, and lower eye lids. So I copy the up/down curve, paste it to the cheeks, nose and lower eye lids. So they can move together and feel connected. Some adjustment needed because they might not share the same volume, but basically I'll just scale the curves to the proper range.

For the exaggeration, and break the feeling that head is a gigantic solid sphere. I also copy the jaw curves to the head scale. So when he opens mouth, the head stretch a tiny bit; when he close mouth, head squashed as well. Unless the project is super cartoony, I personally like to keep this in very subtle way, so you'll feel it, but not necessary see it.

Download QuickTime file HERE

I hope this helps, please let me know if you have any question. If you have better way to do it, please kindly share with me.

cheers.