Tuesday, December 13, 2011

2012 Demo Reel

Finally, my new demo reel is up!
There are many shots from Skylanders included, which were made by the amazing Brain Zoo team. I had a lot of fun by animating them, and hopefully you'll enjoy them as well.

New demo reel, please visit: ErikLeeAnimation.com

cheers!

Tuesday, November 08, 2011

AM Tutoring Tips and Tricks part 14 - Control Your Curves

As an animator who uses the computer as a tool, knowing how the computer works is extremely important. Not only for the sake of saving time, but also for problem solving when something goes wrong (and it always does).

There is one thing I have to clarify at the very beginning, computers don't think! They do not create anything. Actually, the computer is probably the most loyal in-betweener ever.

There are a few principles I follow all the time. The goal of using the graph editor for me is to take advantage of the computer as much as I can. At the same time, the computer won't have a chance to decide anything for me, or send a killer robot to the past to terminate my mom. :)

1. Control your extreme poses.
I always have flat tangents at my extreme pose. So the computer knows where I would like the pose to hit the extreme and then generates mathematically correct in-betweens.

If I don't have flat tangent at the extreme poses...
...then the computer decides where the extreme pose should be. Which you might be lucky to get to look right, but people are not always lucky.

2. After the extreme poses are made, make your breakdown poses controlled as well.
I set up breakdown poses by using keys, instead of pulling tangents in/out. That way I can decide which pose I would like to favor, or how much slow in/out I like.

I know I mentioned that I use weighted tangents all the time, but I only pull them in/out for preview - then set keys after it looks right. I can work fast without wasting time on setting unsure keys, and gain control back later.

For breakdown tangents, please make sure they follow the curve...
If you don't make the tangents follow the curve, those flat(or whatever they are) tangents will create unintended extremes. You might not be lucky enough to get the nice arcs this time. Even though sometimes these types of curves could give me a nice touch of realistic randomness, I'll still set keys on those places pointed by the red arrows, that way everything is still under my control.

When you're frustrated by a popping coming from nowhere, or an arc that just can't be smoothed - before you stand up and get a hammer to give your computer an "animator-smash", calm down, they're innocent. Most of time, we are the ones who cause the trouble. Good news is, we are also the one who can fix it.

I guess in this regard, it might be a good thing to have control issues.

Cheers.

Article created by Erik Lee, refined by Eric Digilov.

Thursday, September 29, 2011

Profile Updated

Another great term has started, can't wait to see you in the QA!!
Just quickly update my profile while waiting, add more projects I did and doing.

Good luck guys! Happy animating. :)


Monday, September 05, 2011

AM Tutoring Tips and Tricks part 13 - Lip sync

Speaking of the lip sync, I usually treat it differently than body animation. Keeping curves clean is not the main concern, instead going straight ahead and making it look right is the way to go.

I start with the jaw up/down and the corners in/out. After I get the overall timing of the lip sync right, I dive into the details and polish. There are a few things on my check list:

1. Anticipation for the dialogue.
2. 2 frames of closed mouth pose on "M", "B", "P" and whenever it is needed.
3. The arcs on the corner.
4. Ease in/out for the dead straight curves in graphic editor.
5. Mouth up/down.
6. Interaction with cheeks.
7. Favoring pose on jaw.
8. Cheek puff, lips interaction...etc.

As an example, I took an audio file from Google Translate for the word: "Popcorn". I chose this word because there are quick mouth open/close poses on "POP". It is a great example of how to apply those principles and make the snappiness work. Here is the video:
The clip on the left is rough blocking. It has accurate timing, but some mouth shapes need more work to read more clearly. On the "POP", as I mentioned before, the mouth open/close is too fast to read. Plus, there are no arcs on the corners, and the overall mouth doesn't look fresh.

I put the polished version side by side with the blocking so you can see the difference better.

First thing I check for is if the anticipation is working. This is extremely important for lip syncs. We "see" the mouth shapes first, and then "hear" the audio later. The mouth shapes are anticipating the audio. In order for the audience to register the dialogue, the mouth shapes need to be a few frames ahead of the audio. Generally speaking, in Maya, I start with by setting a key at least 2 frames before the waveform (in the timeline) starts, and add more frames when needed.

Next, I go frame by frame for the 2 frames of the mouth closed poses. The lips are not just closed on both frames, but on one lower than the other, so the mouth feels more fleshy when the lower lip pushes the upper lip up. Then when the mouth opens, I make it pop open in one frame. I give another frame to favor and settle. Same thing applies to the second mouth closed poses. So even though the mouth moves a lot in a very short amount of time, we can still read it clearly and kill the evil popping monster.

Then, I add some favor poses on the jaw, refine the arcs on the corners, cheek puffs on "P", up/down on the mouth. I finish off with some tiny polish when lips are touching each other to get the fleshy feeling and avoid penetration.

Even though I usually do the lipsyncs straight ahead, I still use of the graph editor for help. Making the animation looks right first, and come back to clean curves up later when I have time. The trick to make lip sync animation better? Keeping your check list in mind, and most importantly, practice, practice and practice.

Have fun! :)

Article created by Erik Lee, refined by Eric Digilov.

Tuesday, August 23, 2011

AM Tutoring Tips and Tricks part 12 - Borrowing keys

While making moving holds, borrowing keys saves a lot of time. Moving holds are not only to keep the character alive, but also give time for the poses to be read by the audience.

A pose can not be read in only one frame. Even in a fast movement, it needs to be given at least 2 frames. A pose will be read in the graph editor like the picture below:
Since we need at least 2 frames for a pose to read, moving holds are required to avoid dead pixels and to keep the character alive. Borrowing keys is the most efficient way of creating moving holds to me .

How do you borrow keys in Maya technically? Move the timeline to the frame where you would like to borrow from (it doesn't need to be a key), middle mouse drag it to where the pose starts, and set a key.

Here is an example of how borrowing keys works. Let's start with a simple ball moving from screen left to right in 24 frames, flat tangents on both sides.
I'd like to make a moving hold for the ending pose (f24), so I'm going to borrow the pose from f22 for f12.
After a quick adjustment of smoothing the curve, the pose is easily read because of the moving hold.

There are still a few adjustment needed after borrowing keys, but it will quickly give you a moving hold .

This is a simple demo for introducing the idea of borrowing keys, when animating a full body rig, more tweaks/adjustments will be needed.

Article created by Erik Lee, refined by Joseph Taylor.

Tuesday, August 16, 2011

AM Tutoring Tips and Tricks part 11 - CG-ish poses

It's very important to make a CG character not look CG-ish. This means we need to eliminate the CG-ish movements and poses. Since we already discussed animating characters from the inside out in Part 5, let's go for posing this week.

I quickly made 2 poses, before and after, so we can compare them side by side. The pose on the left, even though it's a bit exaggerated, shows an example of how a CG-ish pose looks. The pose on the right is refined, and it feels more organic and interesting.

So, the question is, what exactly makes a pose CG-ish?

In most cases, dead straight lines cause the CG feeling. Computers create perfectly straight lines or geometry, they're mathematically correct, but lifeless and boring. Like the picture below, you can see there are a few dead straight lines I drew in red, which show the stiffness. Plus the negative space between the screen right arm and the body is a regular triangle. Those perfect angles and lines here are the main reason this pose looks lifeless and uninteresting.

After refining, you can see there are more curves around the body, which also make the pose more interesting to look at. Bent arms are not only for creating curves, but also make them feel more organic and fresh.

Let's look at more details.
The hand on the left, doesn't have much detail and the spaces between the fingers are very even. The hand on right is more polished, I moved the middle finger closer to the pinkie to breakup the even spacing. Using a little bit of cup, tweaking the finger joints and bending the thumb outward make the hand feel more organic.

Let's take a look at the hand on the hip. The hand on left feels like it's not supporting the weight of the arm and hand, because the wrist and hand are perfectly straight and the fingers are parallel to each other. So I bent the wrist a little, and made the fingers overlap each other. Now we can see the weight being supported, and the contact is more believable.

In sum, breaking the perfectness made by the computer is key to eliminating the CG-ish feeling. I usually use the different attributes as much as possible to make the pose more alive. Let's take a hand for example, don't forget to use palm cup, finger twist and spread, every joint...etc. If penetration is a necessary evil to make the pose more organic, then go for it. Think making poses more graphic, don't be lazy, do whatever you need to do to kill the monster!! :)

Article created by Erik Lee, refined by Joseph Taylor.

Wednesday, August 10, 2011

Skip a week....

Please forgive me for skiping post this week. I need to deal with some personal stuff and packing up for my flight back to US this Sunday. (end of vacation....NOOOOoooooo........)

I'll be back next week, please stay tune! :)


Tuesday, August 02, 2011

AM Tutoring Tips and Tricks part 10 - Defeat Animator's Voldemort.

It's about time to face animators' Voldemort - Constraints. Constraining objects is tricky for animators, if we do it right, it can help us save a lot of time, and make things easier to animate; but it can also put us in an endless hell if we do it wrong. I'm not an expert of programing type stuff, but I wish I was. So the trick I'm going to share is more like my personal experience, and as usual, please kindly share your magic if you know anything that might be better.

There is a universal principle for me when using parent constraints. I usually make the heavier object the parent, and the lighter object the child. The heavier object will be leading the action most of time, and it will be easier to control if I make it the parent. For example, if there is a guy trying to lift a heavy ball, then I'll make the ball the parent, and the hands the child. This way I can animate the ball up and down first, and then work on the hands to eliminate the IK feeling.

Before we dive into animation, I would like to explain the way I usually apply constraints. This trick is very useful, especially when animating referenced files.

First of all, I'd like to clarify the differences between "Parent" and "Parent Constrain". "Parent" (p) will allow you to animate the child’s attributes, but is not able to be switched on and off. "Parent Constrain" is able to be switched on and off, but you can't animate the child’s attributes when it's on. So if you are using a referenced file, then the best way to set up a parent constraint is making an alternate controller. So you'll be able to switch the constraint on and off and animate attributes as well.

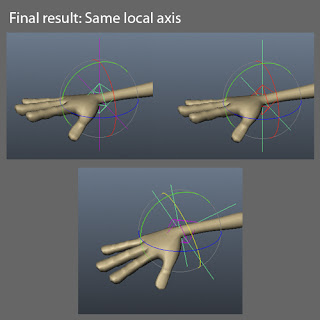
For the alternate controller, the goal is to build a controller which has the same local axis as the original one.

Step 1: Create a locator, and zero out the translation and rotation values.
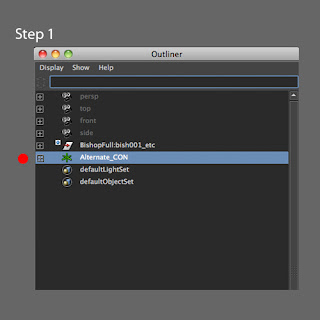
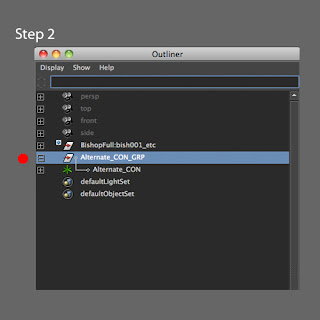
Step 2: Select the new controller, and create a group above it (ctrl+g)
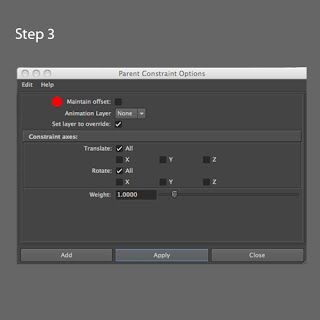
Step 3: Select the original controller you would like the alternate controller to control, in this case, the right IK hand, and then shift+select the new controller group, uncheck "maintain offset" in the "Parents constrain" option box, and hit apply. You should see the new controller snap to the original controller in this step.
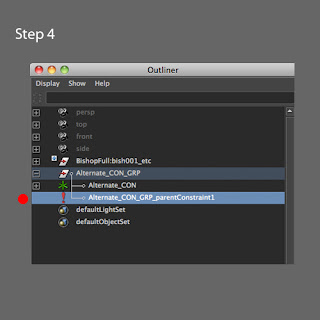
Step 4: Open the outliner, and DELETE the constraint we just created under the new controller group. Now you have a new controller which has the same local axis as the original controller.
Step 5: Select the new controller, then shift+select the original controller, and apply "Parent Constrain" (maintain offset shouldn't make any different at this point) *
After the alternate controller for the hand is built, here is my rule, I'll only set keys on the alternate controller when the constraint is on, and set keys on the original controller when the constraint is off.

The last step is easy (trust me.), select your alternate controller group, then the ball controller, and "Parent" (p) them. DONE, now you should have an alternate controller, which is controlling the original controller, parented to the ball, and is also free to animate.

In sum, I hope this is not too confusing. I'm sure this is not the easiest way to do it, and there must be a lot of mel scripts that can do the same thing with one click. I'd like to share them with you if I find any. But understanding how it works before using magic will help you feel more comfortable fixing problems if something goes wrong (it always goes wrong....always...)

*Make sure you set a key before the parent constraint is applied, so it will add an attribute which allows you switch the constraint on and off.

Article created by Erik Lee, refined by Joseph Taylor.

Tuesday, July 05, 2011

AM Tutoring Tips and Tricks part 9 - Explore Acting Ideas.

Acting is hard, no matter if it's for animation or a live action film. I still have a long way to go in my acting education, but I'd like to share some tricks I've learned here. I usually fall into the trap of using the same cliché acting choices if I don't think through my shot before jumping into the computer. So the first trick will be, and always is: Planning.

There are a few things I'll do for planning. First of all: Set up the background story. Background stories can help you develop the character and add variety. So your character will no longer be just a man sitting in front of a table and talking, which might lead to your clip looking like a student work and being boring. It doesn't need to be super detailed, nor does it necessarily need to be super simple. The trick is to pick a story which can be told in no more than 3 sentence. If you catch yourself needing a paragraph to explain it, then it's probably too complicated.

Let's say we have an angry guy saying "get out of my house", we already set up he is an angry guy, now there are still a million different ways for him to say it. Is he mad at the person he is talking to? Or is he mad at himself? Is he talking to his son? Or just a choppy boy scout who's trying to help him cross the street (sound familiar?)? These background stories will determine how he is going to deliver his line, and what the suitable acting choices can be as well.

After the background story is set, then it's time to develop the acting choices. There is a nice trick I learned from my acting class, which is very hard, but very helpful. Try to make 12 different choices, and they all need to support the story we set earlier. For myself as an example, I usually find my first 3 or 4 takes are really generic, and the last few are more unique and interesting.

If you have time, go vote at the 11 second club. You'll be surprised at how many of the same acting choices and gestures are chosen. Then you'll know the literal meaning of cliché, and feel its power to make your shot less interesting and more ordinary.


Article created by Erik Lee, refined by Joseph Taylor.

Thursday, June 23, 2011

AM Tutoring Tips and Tricks part 8 - Contact

Making a great sense of contact is part of creating believable animation. Everything in CG is just geometry with texture, to make it "looks like" real objects. Unless you have a kick-ass TD to write those magic auto contacts, making believable contact usually requires a lot of time to polish.

Let's say we have a character holding a cup, you might ask, do people always look at the face first? Then why do I need to spend extra time on polishing the hand, which nobody is going to see? I'd say, yes and no. It is true that most of the audience will pay attention to the face, but we "feel" the hand holding a cup. If there is a finger penetrating the geometry, even though we might not see it, we will feel it. "Fingers shouldn't go through cups" is the so-called common sense, when we are aware of the Kitty-Pryde-ish fingers, which is against the library we have built, then that is the deal breaker for believability.

Even though sometimes we polish every contact, it is still not strong enough to make the audience feel it. So we need to emphasize the contact. It's the same concept as the classic principle: Exaggeration. If your rig allows, try to scale the geometry, for 1 or 2 frames, depending on how exaggerated the style is. You might be surprised that our eyes can't catch this while the video is playing. Instead of seeing it, we feel it. I usually try to push this until it is too much, and then pull it back.

Here are a few example from 2 of my favorite movies, Ratatouille and Horton Hears a Who!.

For the Remi Clap, you can tell that his hands are almost scaled up 2 or 3 times bigger, and because this goes very fast, we can't catch the scale, but we can not miss the clapping hands.
BEFORE
AFTER

The same thing happens when Mayor slams his arm into the wall to wake it up, we can't see the scale, but the contact is clearly registered in our minds.
BEFORE
AFTER
It's always great fun for me if I can hide my craziness in one frame or two, and nobody catch’s it. Play with it, until your boss asks you "You having enough fun yet?", or the smile is gone from your clients face. Other than that, keep playing! :)

Article created by Erik Lee, refined by Joseph Taylor.

Friday, June 17, 2011

Should I Work for Free?

Interesting post by Jessica Hische, hopefully this could find you an answer.

Monday, June 13, 2011

Golden Dragon Boy!


Congrats to the gold winners of student academy award, Bernardo Warman, Shaofu Zhang and Lisa Allen.

Don't miss their site: DragonBoyTheMovie.com

Tuesday, June 07, 2011

End of term.

Can't believe this week is actually the last QA for spring 2011!

I had great time to host a QA section this term, and everyone who stopped by, for me, that was the biggest support ever! In fact, I learn a lot by the process of how to make myself clear, and also inspired by every shots you showed.

I wish my jabber here didn't confused you too much, and if they weren't too bad, then I'll apply for another section for next term. (If they stink, please let me know,nicely, please:P )

Time for a little break, go outside and get some life, will be nice to see you come back with full battery charged.

Cheers!

P.S. I'll still try to post sometime during break, so please stop by if you have free time.

Sunday, June 05, 2011

AM Tutoring Tips and Tricks part 7 - Body Language

Having strong, clear poses could help our animation getting more appealing. However, we need to not only design great graphically poses, but also tell the story and show the emotion.

Unless it's an extrem close up shot, character's body occur the biggest space in the scene. Even most of time we look at eyes first, we feel body language as well. So usually I'll work on the body first, make sure the pose itself (without facial expression) is good enough to tell the story, then move on to facial animation. Eventually, body and face need to work together, for me it's easier to get the idea how to pose face if I already had body communicates well.

I found a book which is very helpful for study body language, it wrote by an ex-FBI Joe Navarro. He wrote this book basic on his own experience, and analyse body language in very scientific way. It doesn't really relate to animation, but it's fascinating to know what's behind the poses. This is a fun book to read, and plus, after read this, you might be able to tell if people really mean it when saying "good job". :)
There is an example from the book, the book mention that when we feel upset, or try to escape, we'll try to block ourself from outside. This could be as subtle as by covering the neck or buttoning up jacket. Here we go...
Thanks to Tony Chau for sending me a great mail about topics.

Sunday, May 29, 2011

AM Tutoring Tips and Tricks part 6 - Animate from inside out, thought process.

Last week we told about how to mechanically make your animated character alive, so let's talk about something inside of character's mind, how to analyse and use it to create believable characters.

For me, watching a lot of movies is the best way to learn acting, and it's probably much cheaper than taking acting classes. I watch many movies (but the weird thing is my list never get shorter), but not just watch. I pay attention to their acting, what's the story, what's inside of their minds, what's the relationship...etc. I found this become one of the standerd for me to rate movies, and plus, it makes good movies even more interesting by details which I didn't notice before.

I took a clip from movie named "Fair Game", (Sean Penn, Naomi Watt) to explain how I analyse a scene, and how it's going to help me animating. Before you watch this clip, I'd like to give you a heads up (not-that-much spoil alarm). Sean Penn is an Ambassador to Niger and Naomi Watt is his wife. At this friends gathering, there is one guy starts a racist topic about people from mid-east...


Here is what I read from the scene:

-F120, Sean Penn: "what are you talking about?", then he rise his head and say "no...not the racist BS...".

-F340 he is try to cover his upset and not to embarrass his friend.

-His wife here, apparently who knows Sean Penn the most, knowing something is coming, and wish this guy can just stop talking.

-F660, Sean Penn look at this guy and think about: "Are you sure you want to keep talking? Because I'm not going to stand this!" (Angry)

-F740, Naomi Watt: "no...it's coming." (Embarrassing)

-Then the last shot Sean Penn sits up and strikes back, the scene ends here.

Analyse what's inside of character's mind could help me chose what's the best acting choice for my shot. I usually prefer to simplify it to a word or a simple sentence, then everything else need to support this idea. If I have character is growing his anger inside like Sean Penn here, a little root happy bouncing might not be the best fit.

In this clip, We don't even need to see the end and exactly know what's going to happen next. Sean Penn doesn't need to say a word but express them crystal clear. This is the same goal that animation should achieve. We have no luxury to let audience guess what's going on, otherwise we'll pull the audience out of screen and lose believability immediately.

P.S. As a movie lover, there is nothing better then having a good time and call it research! :)


Friday, May 20, 2011

AM Tutoring Tips and Tricks part 5 - Animate from inside out, physically.

For a human character, in most of cases, animating from root, through body to the finger tips makes character alive. Even though we probably heard of "Animate from inside out" thousand times, I ask myself all the time, "what the heck is that means?" and how to apply it to my animation?

Let's take a simple example to explain, rise a resting arm up and pointing forward. I bet you can do this in real live without even think about it, but as an animator, we need to analyse how exactly this action happened. The order was sent from our brain, go through bunch of muscles and bones, then the action happens (forgive me can't be accurate about the exact process, otherwise I'll be a doctor instead of animator.)

The word "believable" is actually from the library we build in our mind, by watching this kind of action over and over again. If we see a human moves his/her wrist without any tiny movement from forearm, upper arm or shoulder, he/she gotta be either an outstanding break dancer or a terminator. We will catch it instantly because it against the library of our brain. So if we didn't animate our character from inside out, it will take away the believability from audiences instantly as well.

How to apply it to animation? I did a little demo to show my understanding here:


So the left one is what computer gives me after I set 2 poses, which looks ok, but it's lifeless and doesn't feel organic at all. What I did for the right one, which is more polished version, I made the shoulder move first, and then bring the upper arm, fore arm and the hand follows. You might notice this is the classic principle of overlapping action and follow through, and you're right indeed. This is more about knowing why exactly we need to apply animation principles. If we only apply it without knowing why, for this clip for example, it's very easy to fall in the "noodle-y arm" trap.

In sum, Instead of making a rule like "everything needs to move from root!" I prefer to analyse where is the force come from before I start a shot. If my character is sitting and rising his head, then the force will go internally from root, chest to the head. On the other hand, if he got a ball hit on his head very hard(external force), then his head will go forward without any anticipation from root. Figuring out where is the force come from will help you to create believable animation.

Sunday, May 08, 2011

AM Tutoring Tips and Tricks part 4 - Animation Layer
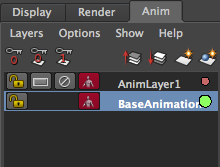

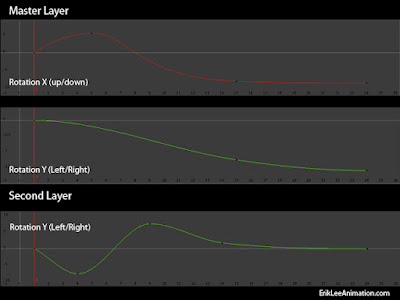
If you're using maya 2010 or above, I found a tool is extremely helpful for animation called "Animation layer". you can find it on the right bottom corner in maya.
It helps me to keep my curves clean and easy to manage when I design to add texture on my animation. I quickly did an animation (and a picture) for a demo to show how I use it and how it helps me.


A simple head rise animation, on the left side is animation without texture, basically I got the timing and everything works in this layer. As you can see in the picture, the Rotation X (RX) is controlling the head rising, and RY here is simple, just slightly going down, which means the head has turn just a little.

It moves smoothly, but boring. The idea here is adding some textures to make it more interesting without messing up the original curves. So I select the head controller, create the animation layer, set keys on RY (start with 0 as default) for the head shake.

As it shows on the left in the video, now I'm not only have a head rise, but it also has a nice head shake as texture. Plus, thank to the animation layer, my curves are clean (in both layers). If I need to tone down the head shake later, all I need to do is going to second layer and scale the curve down.

In Sum, creating too many layers might lead you into chaos. However, it is a powerful tool to add things on top without mess up the original animation. I personally like to use it for the extra touch of final polishing, such as shaking or jiggling, and it only applied after the base animation get approved.

Hope this helps,

cheers.

Sunday, May 01, 2011

AM Tutoring Tips and Tricks part 3 - Reuse polished curves.

How to animate fast? wisely reuse the curves already been done could help a lot.

Unless you have bunch of awesome genius riggers got your back, otherwise it needs a lof of work to make the CG model move organically. Facial animation for an example, working individually on cheeks, nose, lower eye lids could take you hours and hours. so why not to use the curves already finished, and apply them to the other connected parts?

I'll take last shot I did for an example.

After I finaled the lip-sync, most of all, up and down on the jaw. It connects to the cheeks, nose, and lower eye lids. So I copy the up/down curve, paste it to the cheeks, nose and lower eye lids. So they can move together and feel connected. Some adjustment needed because they might not share the same volume, but basically I'll just scale the curves to the proper range.

For the exaggeration, and break the feeling that head is a gigantic solid sphere. I also copy the jaw curves to the head scale. So when he opens mouth, the head stretch a tiny bit; when he close mouth, head squashed as well. Unless the project is super cartoony, I personally like to keep this in very subtle way, so you'll feel it, but not necessary see it.

Download QuickTime file HERE

I hope this helps, please let me know if you have any question. If you have better way to do it, please kindly share with me.

cheers.

Wednesday, April 20, 2011

AM Tutoring Tips and Tricks part 2 - How to use TweenMachine to quickly create breakdown poses.

"How to animate faster?"
This is the question I've been asked constantly. So I think this might be a good topic to talk about for 2nd week.

Before we start it, I should make myself clear, there is NO magic trick can double up speed, or "appeal" button to magically turn animation to master piece (If there is one day human ever invent this function, then we all gonna lose job for sure.). Everything comes from practice, sounds cliche? but it's true. Getting more experience is the only one way, which might include the detail observation from real life, knowledge of software or most of time, we learn from our mistake. So, don't be afraid to experiment new workflow, or try a new way to approach a shot. The more different attempt we had, the more experience we got. As a student, I think the priority is to learn how to make it right but fast. We can only produce quality animation with speed when we already knew how.

Back to the topic, even though there is no shortcut to double our speed, there are tools can help . I'm going to introduce the tool I use the most while animating, "TweenMachine". (you can find it at CreativeCrash.com, registration needed)

How to use: select controllers, move timeline between 2 keys, and move the bar (can't be easier.) -100% means the new key will be exactly like pose A, and 100% will be pose B. You can turn on the "overshoot" under options menu, which allows you pull the bar to 150% or -150%.

Here is a jumping demo I made to show how it works.

Screen Left, no breakdown, key poses only.
Screen right, this took me around 10 minutes to add breakdown poses by only use TweenMachine (further Adjustment needed), the red dot on the right bottom corner means breakdown poses.


You can download this video from HERE.

So I use TweenMachine to quickly create breakdown poses, and also decide the pose favoring. For example, I want the head lead the jumping, so the head will be favoring key pose on F15, and hands are delayed to create follow throw. Same steps applied with landing, the body come first, and then head and hands follow.

In sum, even though by using this tool, you can quickly get the favoring breakdown, adjustment still needed for the final pose. It can quickly gives you a starting pose, and avoiding the wicked curves cause by gimbal lock.

P.S. you can do the same thing without using TweenMachine by borrowing keys on timeline, by that means, move your mouse one the place you'd like to borrow between 2 poses, middle mouse drag to middle and set key.

Hope this helps, if you know something works better, please kindly share with me. :)

Cheers!

Tuesday, April 12, 2011

AM Tutoring Tips and Tricks part 1 - Maya Hot Keys Set Up For Animator.


Hey Animators,

I'm glad that AM selected me to host an 1 hour alumni QA on 8pm pacific every monday! It's so excited to me that I can share a little bit my experience with fella animators. I wish these tips and tricks can help you some how.

These tips and tricks will be my personal preferences, and not necessary works for you. If you know(or hear) something better and make our work easier, please ignore whatever I wrote here and kindly share them with me. :)

Ok, let's start with something easy, my Maya hot keys set up for animator.

The idea here is to reduce the time from press bottons in maya, or to avoid clicking the mouse.

A note before set up, I always use "Weighted Tangents" in graphic editor.

Here are my hot keys set up.

+ -add inbetween
- -remove inbetween
' -break tangent
; -free tangent weight
ctrl+' -Unify tangent
ctrl+; -lock tangent weight

You can modify your hot keys by go to window>setting/preferences>hotkey editor
These keys are all locate under "graphic editor".

So how they work?

+/- (add/remove inbetween) is very useful especially in blocking stage. After I throw bunch of poses in my scene, it can help me quickly put the poses on the right timing by just press +/-

How to use: Select all the controllers and put the timeline between keys, press +/- could move everything forward or backward. (you can find it on the right click menu on timeline as well.)

'/; are the hot keys I use while refining my curves in second pass or polishing. It makes free/break tangents easier by just press one button on keyboard, and lock them back quickly after I got the nice curves I want. You can do it by click little icon on the top of graphic editor, but for me, personally I feel it's much faster by press '/;.


In sum, these hot keys set up are not gonna magically save you hours, but they do save a little from here and there.

P.S. +/- default function could still work on the number pad (Scale up/down manipulator) after changed; '/; are not assigned for anything in default.

Hope this helps, happy animating!

Cheers.